
Welcome to the GRIT Support Center! Here, you’ll find articles, links, photos, videos, manuals, and more, all designed to help you get back outside as soon as possible. Use the section headers to narrow your search.
Rather talk to a member of the GRIT team?
Phone: 877-345-4748, Email: support@gogrit.us
Hours: M–F, 9:00AM–5:00PM ET
User Manuals & Installation Guides
Utility Clamp - Foot Platforms
How-To Videos
Basic Tips & Tricks
Tensioning the Chains
Adjusting the Parking Brakes
How to Roll Backward in a GRIT Freedom Chair
How to Rewrap GRIT Freedom Chair Levers
front wheel & fork assembly
Inflating the Wheels
Loading & Unloading a GRIT Freedom Chair In a Vehicle
Frequently Asked Questions (FAQs)
Flying and Transportation
- Flying with the GRIT Freedom Chair: How does it work? What do I do? What happens if it gets damaged?
Maintenance and Care
- What tools do I need? What kind of maintenance should I do on my GRIT Freedom Chair?
- Routine Maintenance and Care: What to Do
- How should I care for my GRIT Freedom Chair after a beach trip?
- How should I store my GRIT Freedom Chair when I'm not using it?
Wheels and Tires
- I have a flat tire
- How do I check the tire pressure? What should the pressure be?
- What's the narrowest tire you can put on a GRIT Freedom Chair wheel?
- I am having a hard time attaching my rear wheels.
- There is extra space on one wheel. Is it on all the way?
- Can I use different wheels on my GRIT Freedom Chair?
Levers, Chains, and Drive Issues
- Can I swap out the chain rings on my GRIT Freedom Chair?
- Can I swap out the chains on my GRIT Freedom Chair?
- My levers got stuck in the wheel spokes. What do I do?
- Why do my chains keep loosening?
- Why does pushing the levers not immediately turn the wheels?
- Why doesn’t my GRIT Freedom Chair roll straight?
Modifications and Accessories
- What kind of modifications can I make to my GRIT Freedom Chair without voiding the warranty?
- Can I put push rims on my GRIT Freedom Chair?
- Can I put my GRIT Freedom Chair on rollers for an indoor workout?
Fit and Comfort
Returns and Warranty
- I am past the 30-day trial period but can no longer use the GRIT Freedom Chair. What should I do?
- Can I return my chair?
Performance
Flying with the GRIT Freedom Chair: How does it work? What do I do? What happens if it gets damaged?
Click here to read an article all about flying with the GRIT Freedom Chair!
When flying with a GRIT Freedom Chair, we always recommend checking the chair at the gate. Take it with you through security, through the airport, and have an attendant tag the chair for you right at the gate. This is better than checking the chair with your luggage because it means the chair will be handled by fewer people, travel over fewer (or no) carousels, and be in your sight for as long as possible. When you check the chair at the gate, the attendants will carry it down the terminal staircase, place it into the plane, and bring it back out to you when you land.
How to identify and address damage
1) When you land and put eyes on your chair, always give it an inspection. Check that the wheels spin freely. Check that the front fork is straight. Check that the seat back is in good condition. Check that the footplate is still attached. If there's any damage that wasn't there when you boarded:
2) Let an attendant know, immediately. They will have you fill out an accident or damage report, which will get the repair process going. It is extremely important that you address this before leaving the airport. Otherwise, it may not be clear that the damage happened at the airport (and not at the coffee shop down the street). Make sure to leave your email and phone number on the form so the airline can easily contact you. You can also add the GRIT contact information (support@gogrit.us, 877-345-4748), as we will likely be involved in the next steps!
3) Call GRIT. Whether you've just arrived at your vacation destination or are just getting home, we want to do what we can to get your chair back in action. We'll follow the airline's protocol, but we can also give you the parts or tips you need to use your chair safely, while the airline process moves forward.
4) The airline (or the third-party, damage-repair company they have hired) will then contact you. This follow-up is usually to say "yes, this damage was our fault" and "here's what we need to move forward with the repairs." They'll communicate with GRIT to find out how best to address the damages. We'll work with you to get photos, videos, and a description of the damage to find out what can be repaired and what needs to be replaced.
5) GRIT will invoice the airline or third-party company for the replacement parts or repairs. They will pay that invoice. GRIT will send you any necessary replacement parts.
6) The parts of the GRIT Freedom Chair are generally easy to swap in and out, but some repairs may need to be handled by a bike shop. If that is the case, GRIT can help you find one, or we can discuss the repairs/replacements with you over the phone. It can be stressful to have to go through any of this, so we're here to help however we can.
Let GRIT know what's happening. We'll help move things along.
If your GRIT Freedom Chair was damaged while under the airline's supervision, they do require some information to handle things properly (usually photos/videos of the damage), but with patience and communication, you'll be rolling again before you know it.
If you have any questions about traveling, damage assessment, or anything else, send us a message at support@gogrit.us.
What tools do I need? What kind of maintenance should I do on my GRIT Freedom Chair?
Whether you're going on a vacation, a Spartan Race, a long hike, or just want to be prepared for anything that comes your way, read more below!
Tools
To be fully prepared for what your next adventure throws at you, read below for a list of useful tools.
· Phillips screwdriver. The first tool in adjusting chain tensioning (see under How-To Videos below for Tensioning the Chains video). Tip size #3 is best. A 3” shank or longer will allow you to access the tension screws. View one option on Amazon, here.
· Adjustable wrench. This is the second tool required for chain tensioning. (A 13mm wrench is best, but pliers can work, too). View one option on Amazon, here.
· Allen (hex) keys. You'll likely need these sizes: 4mm, 5mm, 6mm. View one option on Amazon, here.
· Bike pump. Always make sure your air is filled to the correct pressure. 40 PSI is a safe number to remember for all three tires. Schrader valves (not Presta) come standard on the GRIT Freedom Chair (the same valve as automobile tires). View one option on Amazon, here.
· Backup tube (or tubes). See more information below at "I have a flat tire!" on what tubes you’ll need. Tire levers can make tire removal and tube change even easier, and patches can help if you don’t have a tube. View one option on Amazon, here.
· Electrical tape. If your levers are wrapped in tape (not lever sleeves) a strip of electrical tape will keep them from unraveling. View one option on Amazon, here.
· Lubricants. These keep your chain and other parts moving extra smoothly. GRIT commonly uses “Tri-Flow” brand PTFE lubricant on the chain and seat back. View one option on Amazon, here.
· Water/snacks. Using the GRIT Freedom Chair is a workout! Make sure you stay hydrated and energized. Some bike bags and water-bottle cages work well, too.
Maintenance
· Always: Keep your GRIT Freedom Chair out of the rain when not in use. The frame is zinc-plated and covered with a high-quality powder-coat, but excessive exposure to rain and moisture will decrease the life of the frame. If it gets wet, dry it with a clean towel. Keep the bearings and other moving parts free of sand and fine particles.
· Before every ride: Check to make sure the tires are not flat. Make sure the chains are greased and not sagging. If there is dirt on your chains, clean and re-grease them. Confirm that parking brakes are adjusted for your tires.
· Every two weeks: Inflate your tires. 40 psi is a safe number to remember for all three tires.
· Every month: Make sure the chains are greased and tighten them if necessary. Actuate the wheels and drivetrain to confirm everything is moving smoothly.
· After a beach trip: If you ride your GRIT Freedom Chair at the beach or near the ocean, hose it down with fresh water to clean off the salt and sand from the frame, chain, and wheels. Grease the chain after hosing it down. Dry your chair with a clean towel. Submersing or pressure-washing the GRIT Freedom Chair can displace the grease in bearings, so take care to inspect rotating parts if this has occurred.
I have a flat tire
Here is everything you need to know about replacing the tubes in the front tires or rear tires of your GRIT Freedom Chair.
Rear Tire Tubes – Standard Mountain Bike Tires
The rear tires are mountain bike tires, which means they have standard bicycle tubes. To replace those tubes, you’ll need 26” x 1.5/1.75" tubes with Schrader valves. Any bike shop will have these tubes; they’re also easy to find online. Because these are standard tubes, there are tons of options out there—standard, puncture-resistant, slimed, etc. Ask your bike technician if you’re unsure about which variation is best for you.
Once you have the new tube, you can follow the instructions for tube replacement on a bicycle. Do a quick online search for “how to replace a bike tire tube” and those instructions will get you back and rolling (like these).
Rear Tire Tubes – Pro Model or Sand/Snow Wheels
The GRIT Freedom Chair: Pro and our Sand/Snow Tires use slightly wider tubes that measure 26” x 2.0”. You can use dedicated 2” tubes or the 1.5/1.75” tubes used on the standard mountain bike tires—they will all be compatible.
Front Tire Tube
The front tire tube is a bit different than the rear tire tubes. The front tire on the GRIT Freedom Chair is a mountain board tire and is composed of two rim halves clamped together. The tube for the front tire measures 2.80"/2.50"-4".
One of our riders, Tyler, wrote the step-by-step instructions for the tube-replacement process—see them below!
Step 1: Remove your front wheel from the front fork assembly using a 5mm Allen key and 1/2” box wrench to secure the axle.
Step 2: Squeeze the tire while depressing the valve stem to break bead (i.e., break the connection of the wheel to the rim).
Step 3: Remove the clip securing the axle and then remove the axle itself. Then, begin the process of separating the rim halves by removing the bolts in the three arms of the wheel hub.
Step 4: Split the two rim halves, making sure not to lose any small parts. Remove the flat tube.
Step 5: Slightly inflate the new tube and insert it into the tire.
Step 6: Screw the two halves of rim back together, taking care to ensure that the valve stem is centered in its respective hole within the rim. The locating tabs will help with this.
Step 7: Fully inflate the new tube (45 PSI is a good benchmark).
Step 8: Slide axle through the new wheel. Remember to add the spacing ring as well.
Step 9: Reattach the axle and wheel to front fork.
Step 10: Done!
How do I check the tire pressure? What should the pressure be?
Checking the tire pressure in your GRIT Freedom Chair is as easy as checking it on a bicycle. Here is some information you may find helpful!
To check the tire pressure on any of the three wheels on your GRIT Freedom Chair, simply access the valve (some valves have caps while others do not). Once you can see the valve, attach a tire gauge to the valve—noting whether you have a Presta or Schrader valve. If you need to add more air to your tires, swap your tire gauge for a tire pump and inflate!
We recommend a PSI of 45 for both the front and the rear tires. You may find it useful to decrease your tire pressure in snow or mud and increase it when traveling on pavement or concrete.
My front wheel wobbles when I go really fast. Is that normal?
This is called caster flutter and is easy to fix! Some wobble at high speeds is normal and is a phenomenon known as caster flutter. Speed, as you know, is the primary cause of caster flutter. You can reduce its effect by slightly tightening the top bolt of the headset above the front wheel.
Remember: You don't want the bolt super tight, as you still want the front wheel to be able to rotate freely, but if you tighten the bolt until you start to feel some resistance to the wheel rotation, then you should be able to reduce the flutter and get back to the races.
If you’ve checked the tightness of that bolt and the wheel still seems like it’s wobbling more than it should, let’s chat!
Can I swap out the chain rings on my GRIT Freedom Chair?
Absolutely! Before you do, though, read a bit about why you'd want to and how it'll change your riding experience.
The chain rings are -- like most parts on the GRIT Freedom Chair -- components you can purchase online or at your local bike shop. While you can certainly add larger chain rings, there are some things to keep in mind before you do.
Chain rings are the circular, spiked, metal pieces whose teeth guide your chain over the drivetrain. Chain rings come in all sizes, often measured by their teeth count. The bigger the chain ring, the harder your GRIT Freedom Chair will be to push; however, bigger chain rings also mean you can cover more ground with each stroke.
The chain ring that comes standard on GRIT Freedom Chairs are 4-bolt, 64mm, 26-tooth chain rings. This, we've found, is the "Goldilocks Solution" in that it isn't too big or too small. A larger chain ring would make it especially difficult to gain momentum on grass, snow, sand, or uneven terrain; a smaller chain ring would make it much more difficult to get up to speed on flat or paved terrain. Because some riders want to stick on pavement and others want to stick to rough terrain (and we encourage riders to do both!) the 26-tooth chain ring was a good way to allow that to happen.
That being said, some GRIT Freedom Chair riders only use their chairs on paved roads and want to go as fast as possible (e.g., those looking to compete in road races). These riders are the perfect candidates for a chain ring upgrade. The biggest chain ring you can add to a GRIT Freedom Chair is a 32-tooth ring. Remember, though, the extra diameter of a chainring that size will make it tough to get up to speed, especially if you're tackling roots, rocks, or loose terrain.
Adding a larger chain ring will alter the chair's center of gravity; combat this by adding an additional 1-2 extra links to each chain.
If you're looking to go faster, the first modification you should consider is the Drivetrain Upgrade. This is going to give you the most "bang for your buck" as far as speed is concerned. To order or learn more about this accessory, check out our Accessories page here.
Can I swap out the chains on my GRIT Freedom Chair?
Yes! The chains on GRIT Freedom Chairs are standard bike chains, so any bike shop (online or brick-and-mortar) will have the chains you’ll need. Standard GRIT Freedom Chair chains are 9-speed, 3/32” chains. There are 55 links in each chain, plus one master link (for the master links, we use SRAM powerlinks or KMC missing-link style links).
My levers got stuck in the wheel spokes. What do I do?
Don't panic and don't force anything too hard. While this situation is rare, there are easy ways out of it.
When a lever falls between the spokes of the rear wheels, it can often be tempting to brute-force it back out again. Don't get us wrong—a little wiggling is fine, but you shouldn't ever rip or push the lever against the spoke. Doing this runs the risk of breaking a spoke, which requires special tools and equipment to fix.
Instead of forcing the lever out, the best course of action is the remove the wheel itself. To do this, first press the button on the axle in the center of the wheel. This will disengage the wheel from the axle receiver. You should be able to pull the wheel off of the axle receiver (with the lever still in it). Depending on how far the lever is jammed, you may have to wiggle the wheel or the lever—the lever should be able to move an inch or two (forward or backward), which should give you the clearance to remove it. Turning the wheel a bit—being careful not to force the spokes too roughly against the lever—can free up some space, too. It may be helpful to have a friend focus on the lever while you focus on pulling off the wheel.
What kind of modifications can I make to my GRIT Freedom Chair without voiding the warranty?
Many of our riders modify their GRIT Freedom Chairs to improve their performance, comfort, or just to make them look outright awesome. But where is the line? Read more to find out what adjustments are okay and what ones aren't.
Here at GRIT, we encourage riders to make modifications and personalized upgrades to their GRIT Freedom Chairs. After all, once the chair is yours, you should make it as comfortable, stylish, and perfect for you as possible. Some popular additions include custom lever wraps, custom wheel-spoke wraps, stands for phones, cup holders, leg rests, and more!
However, it is important to know when a particular modification risks voiding the GRIT Freedom Chair warranty. Certain modifications may affect the integrity of the chair, cause performance or structural issues, or negatively affect key functionalities or design elements of the chair. Here's the rule of thumb:
Any modification that prevents the chair from being returned to its original state will void the warranty.
Looking to design a custom bracket that wraps around the boom of the chair to hold an accessory bag? Your warranty is safe! Need to drill a hole through the boom to make this bracket fit on? Warranty is not safe! Any cutting, drilling, sawing, breaking, or bending is usually going to void the warranty. Of course, voiding the warranty isn't the end of the world, but if you plasma-weld a custom lawnmower attachment to your GRIT Freedom Chair frame, please understand GRIT can't be responsible for any consequential performance issues.
Not sure if your modification will void the warranty? Contact us at support@gogrit.us and we'll let you know.
I am past the 30-day trial period but can no longer use the GRIT Freedom Chair. What should I do?
We understand that while the GRIT Freedom Chair may have initially been a great match for you or your loved one, things happen, setbacks happen—life happens.
If after 30 days, you or your loved one can no longer use the GRIT Freedom Chair, we want to help you get it to someone who can. Many organizations will keep a GRIT Freedom Chair on-hand for use in events, hikes, races, competitions, and even temporary rental. Here are a few places to start:
· Adaptive Sports and Recreation Organizations: The GRIT Freedom Chair is often perfect for these groups. Adaptive sports organizations host events, competitions, leagues, and more. They strive to connect adults and kids with disabilities to the satisfaction and competition of sports—and they can almost always take advantage of a GRIT Freedom Chair.
· Schools & School Districts: Even if a school has just one GRIT Freedom Chair, many students over many years will be able to take advantage of it. Contact your local school or after school program to see if they’d be able to use a GRIT Freedom Chair.
· Summer Camps & Adventure Camps: These organizations are dedicated to the pursuit of adventure in all forms. They provide the staffing and equipment that allow people with physical disabilities or mobility impairments to go hiking, trail riding, snowshoeing, to the beach, and more— all of which can be made better with a GRIT Freedom Chair.
· Other Veteran Associations: Many organizations are dedicated to physically and financially helping veterans. For example, Oscar Mike and Operation Enduring Warrior help injured veterans access adaptive sports.
· Trail Associations: These groups provide stewardship, mentorship, trail maintenance, education, orientation trips, and more. They often coordinate hikes and are always working to make trails more accessible.
Click here for more information on specific organizations that utilize GRIT Freedom Chairs in their programming.
Need help finding a new home for your GRIT Freedom Chair?
We speak with tons of organizations every week, many of which would love the opportunity to have a used GRIT Freedom Chair. We're happy to make an introduction or even help facilitate the donation. Want to donate the chair to a specific kind of organization but unsure about where to start? No problem. Contact us at support@gogrit.us.
How should I care for my GRIT Freedom Chair after a beach trip?
Salt and sand can be very damaging to bicycles and GRIT Freedom Chairs alike. Follow these simple steps to protect your chair and to keep rolling smoothly!
Salt spray and beach sand can affect the gearing, chains, and the rust protection of your GRIT Freedom Chair. Thankfully, it's real easy to prevent serious damage by:
1) Hosing down your GRIT Freedom Chair with a hose after you've ridden it on the beach. The goal is to remove as much sand and salt as possible.
2) After hosing down the chains, lubricate them.
3) Just as the chains need to be lubricated, it is a good idea to tend to the nipples in the wheel spokes and other moving parts (some sources recommend lubricating the spokes every time they get wet or are at the beach). All moving parts on the GRIT Freedom Chair are greased to ensure easy and smooth operation; because water and salt can wash or erode this grease away, it is always a good idea to re-lubricate these parts.
4) If the chair will be parked outside near a beach, it isn't a bad idea to cover it. Some riders do this with grill covers or tarps, but as long as you're putting a barrier between your chair and the harmful effects of salt spray, you'll be in good shape.
How should I store my GRIT Freedom Chair when I'm not using it?
You may not use the GRIT Freedom Chair as your primary wheelchair, and that's fine! Here are a few things to consider when storing it.
- It may save you some space to quasi-disassemble your GRIT Freedom Chair. Remove the two rear wheels and the seat back to make the chair easier to store.
- Make sure the GRIT Freedom Chair is at no risk of being placed in standing water, as this could damage the paint and the working parts of the chair.
- If storing your GRIT Freedom Chair outside, be especially careful to protect it from the elements. Some riders use grill covers or tarps—storing your chair in a shed, under a pavilion, or in a garage would be best!
- Note that, depending how long you've kept your GRIT Freedom Chair in storage, you may have to re-inflate the tires and re-grease and re-tighten your chains. This is totally normal and no different from the maintenance one would expect to perform on a bicycle.
Routine Maintenance and Care: What to Do
What should you do before every ride? Every two weeks? Every month?
Before every ride: Check to make sure the tires are not flat and the chains are not sagging. Confirm that parking brakes are adjusted for your tires.
Every two weeks: Inflate your tires. We recommend that you inflate the rear wheels to 45 PSI and the front wheel to 40 PSI. Your user manual has detailed information about tire pressures; proper tire pressure ranges are also moulded on the sidewall of the tires. Riders can adjust pressure to their preferences and terrains, within this range.
Every month: Make sure the chains are greased and tighten them if necessary. We recommend bike chain lube or other lubricants like Tri-Flow. Actuate the wheels and drivetrain to confirm that everything is moving smoothly and nothing is rubbing.
Caring for Your Chair
- Keep your GRIT Freedom Chair dry and out of the rain when not in use. The frame is zinc-plated and covered with a high-quality powder-coat, but excessive exposure to rain and moisture will decrease the life of the frame. If it gets wet, dry it with a clean towel.
- Keep your chains greased. We recommend inspecting your chains monthly. If they appear dry or rusted, add a few drops of bicycle chain grease. If they are sandy or filled with dirt, clean the chains and then re-grease.
- Keep the bearings and other moving parts free of sand and fine particles.
- If you ride your GRIT Freedom Chair at the beach or near the ocean, hose it down with fresh water to clean off the salt and sand from the frame, chain, and wheels. Grease the chain after hosing it down. Dry off your chair with a clean towel. Submersing or pressure washing the GRIT Freedom Chair can displace the grease in bearings, so take care to inspect rotating parts if this has occurred.
- Make sure the tires are kept inflated to the PSI noted on the sidewall of the tire. We recommend 45 PSI.
Can I return my chair?
If you received the chair from us less than 31 days ago, you are still covered under the GRIT Guarantee. Click the below link for more information on the process:
The paint on my levers is wearing off. Is this okay?
After a fair amount of use, the powder coat on your levers may start to wear off, especially where the lever engages with the wheel. Don't worry! Here's why.
The black powder coat on your levers is purely cosmetic. As you are now seeing, beneath that black powder coat is the steel core of the levers. Wearing away the powder coat is completely normal and, believe it or not, will actually enhance the performance of the levers.
Our steel levers are protected with a zinc chromate plating that has a higher coefficient of friction (COF) than the layer of black powder coat. A higher COF means more friction between the lever and the wheel, which means faster and easier braking. The rubber tires will never be compromised by the contact with the steel.
All this being said, if the metal itself is wearing away (i.e., there's a hole in your lever), you are putting the levers to the test—and that is great. However, you may want to replace your lever(s) to make sure the braking mechanism is in safe and functional condition. If you've worn a hole in your lever(s), contact us at support@gogrit.us and we'll get you set up with some new levers.
Why do my chains keep loosening?
This is normal! Brand-new bike chains tend to stretch out and loosen, especially during the first couple of months of use or when a GRIT Freedom Chair is put under high stress. Tension your chains using the following instructions. See the Tensioning the Chains How-To Video below or the GRIT Freedom Chair User Manual for help tensioning the chains.
Why does pushing the levers not immediately turn the wheels?
Check the tension of your chains, adjust your push stroke, and find a wide and flat area.
If there is a delay/lag between when you push your GRIT Freedom Chair levers and when the wheels turn, you should first check the tension of your chains. See below for a video to see the process.
Delayed engagement can also happen when riding the chair in a confined space, engaging the levers with inconsistent strokes, or traveling at high speeds. Move your chair to a wide-open, flat space and engage the levers with slow, deliberate strokes.
Why doesn’t my GRIT Freedom Chair roll straight?
Make sure your GRIT Freedom Chair fork is centered, the headset is vertical, and the chains are tensioned. Also confirm that side slope is not an issue.
Every GRIT Freedom Chair is both visually examined and roll-tested before shipment. However, here are a few checks to make sure everything is working as it should:
Step #1: Confirm that your front wheel centered in the fork.
Your front wheel should be positioned in the center of the fork (the metal bracket that holds the wheel onto the frame). To make sure this is the case, safely lean the GRIT Freedom Chair backward so the back rest is against the floor. You can also move in front of the chair to get a head-on view of the chair. Next, examine the wheel. Is it centered or is it shifted to the left or right? Next, tap the wheel with your hand to spin it. As the wheel is spinning, look at the center tread—is it spinning straight or snaking left and right? If the latter, take a photo or video of your fork to support@gogrit.us and a GRIT team member will contact you with next steps.
Step #2: Confirm that your headset is vertical.
The headset holds the fork to the frame of your GRIT Freedom Chair. It lives above the fork and front wheel and should be vertical. To confirm that this is the case, lean the GRIT Freedom Chair backward so the back rest is against the floor. You can also move in front of the chair to get a head-on view of the chair. Next, inspect the headset. Everything in the headset should be vertical. If you suspect it’s angled, take a photo of the headset (from the front) and email it to support@gogrit.us, and a GRIT team member will contact you with next steps.
Step #3: Confirm that your chains are properly tensioned.
If the chains aren’t equally tensioned, it’ll cause one side of your GRIT Freedom Chair to move faster than the other. See the Tensioning the Chains video under How-To Videos for help tensioning the chains.
Step #4: Make sure side slope isn't causing the issue.
Most roads are intentionally built with side slope to allow water to run away from the center of the street and toward the drains. This is great for drainage but not so great for adaptive equipment! Ride your GRIT Freedom Chair in both directions on the same side of the street (making sure there is no traffic!) and then over grass. This will help determine if side slope could be part of the problem.
To navigate side slope or crowned roads:
Tip #1: Use quick lever pushes.
Slow, full-extension pushes will make it harder to correct against the side slope.
Tip #2: Keep your back against the seatback
Avoid leaning all the way forward during your lever pushes. This slows you down and will make side slope more difficult. Keep your back flush to the seatback (slight separation is okay) and throw short "jabs" with the levers, similar to a boxer with a speed bag.
Tip #3: Consider this advice from Corwyn, a GRIT Freedom Chair owner:
I remember this from my days and skate and x-country skiing...Try an "asymmetrical plant" with your bars. So what you're going to do is put your hand in the power stroke position on the sloping side of the grade so you get the most power there. Have your opposite hand in the medium-power position. Push hard with your powerstroke on the graded side and then—just right as you begin your power stroke—follow it up with a short burst from the other side. It should sound like a heartbeat when you do it. Just keeps your momentum moving forward and fast without having to correct or only make minor adjustments to your direction. I adapted this from cross-country skiing because we do the same thing with our poles to keep momentum up a hill. You can do the same thing with your GRIT. Check it out! It really makes riding on graded services so much easier and keeps your momentum moving forward.
Tip #4: Consider Steering Pegs
If Steering Pegs are an option, they can be a game-changer when dealing with sloped roads. Check them out on the GRIT Accessories page (click here) or call to ask the GRIT team about this accessory!
Tip #5: Get a buddy!
The GRIT Freedom Chair makes it easy for you and a friend to work together. The Trail Handles accessory makes this particularly effective. Have someone walk behind you to give a bit of steering assistance! Your assistant can give as little or as much support as you'd like—sometimes just a fingertip of assistance is all you need. Together, you may be able to go farther, faster, longer, and have a lot more fun than going solo!
Can I put my GRIT Freedom Chair on rollers for an indoor workout?
Step #1: Put your rear wheels on rollers. Motorcycle-wheel cleaning stands (like the ones below) are perfect.
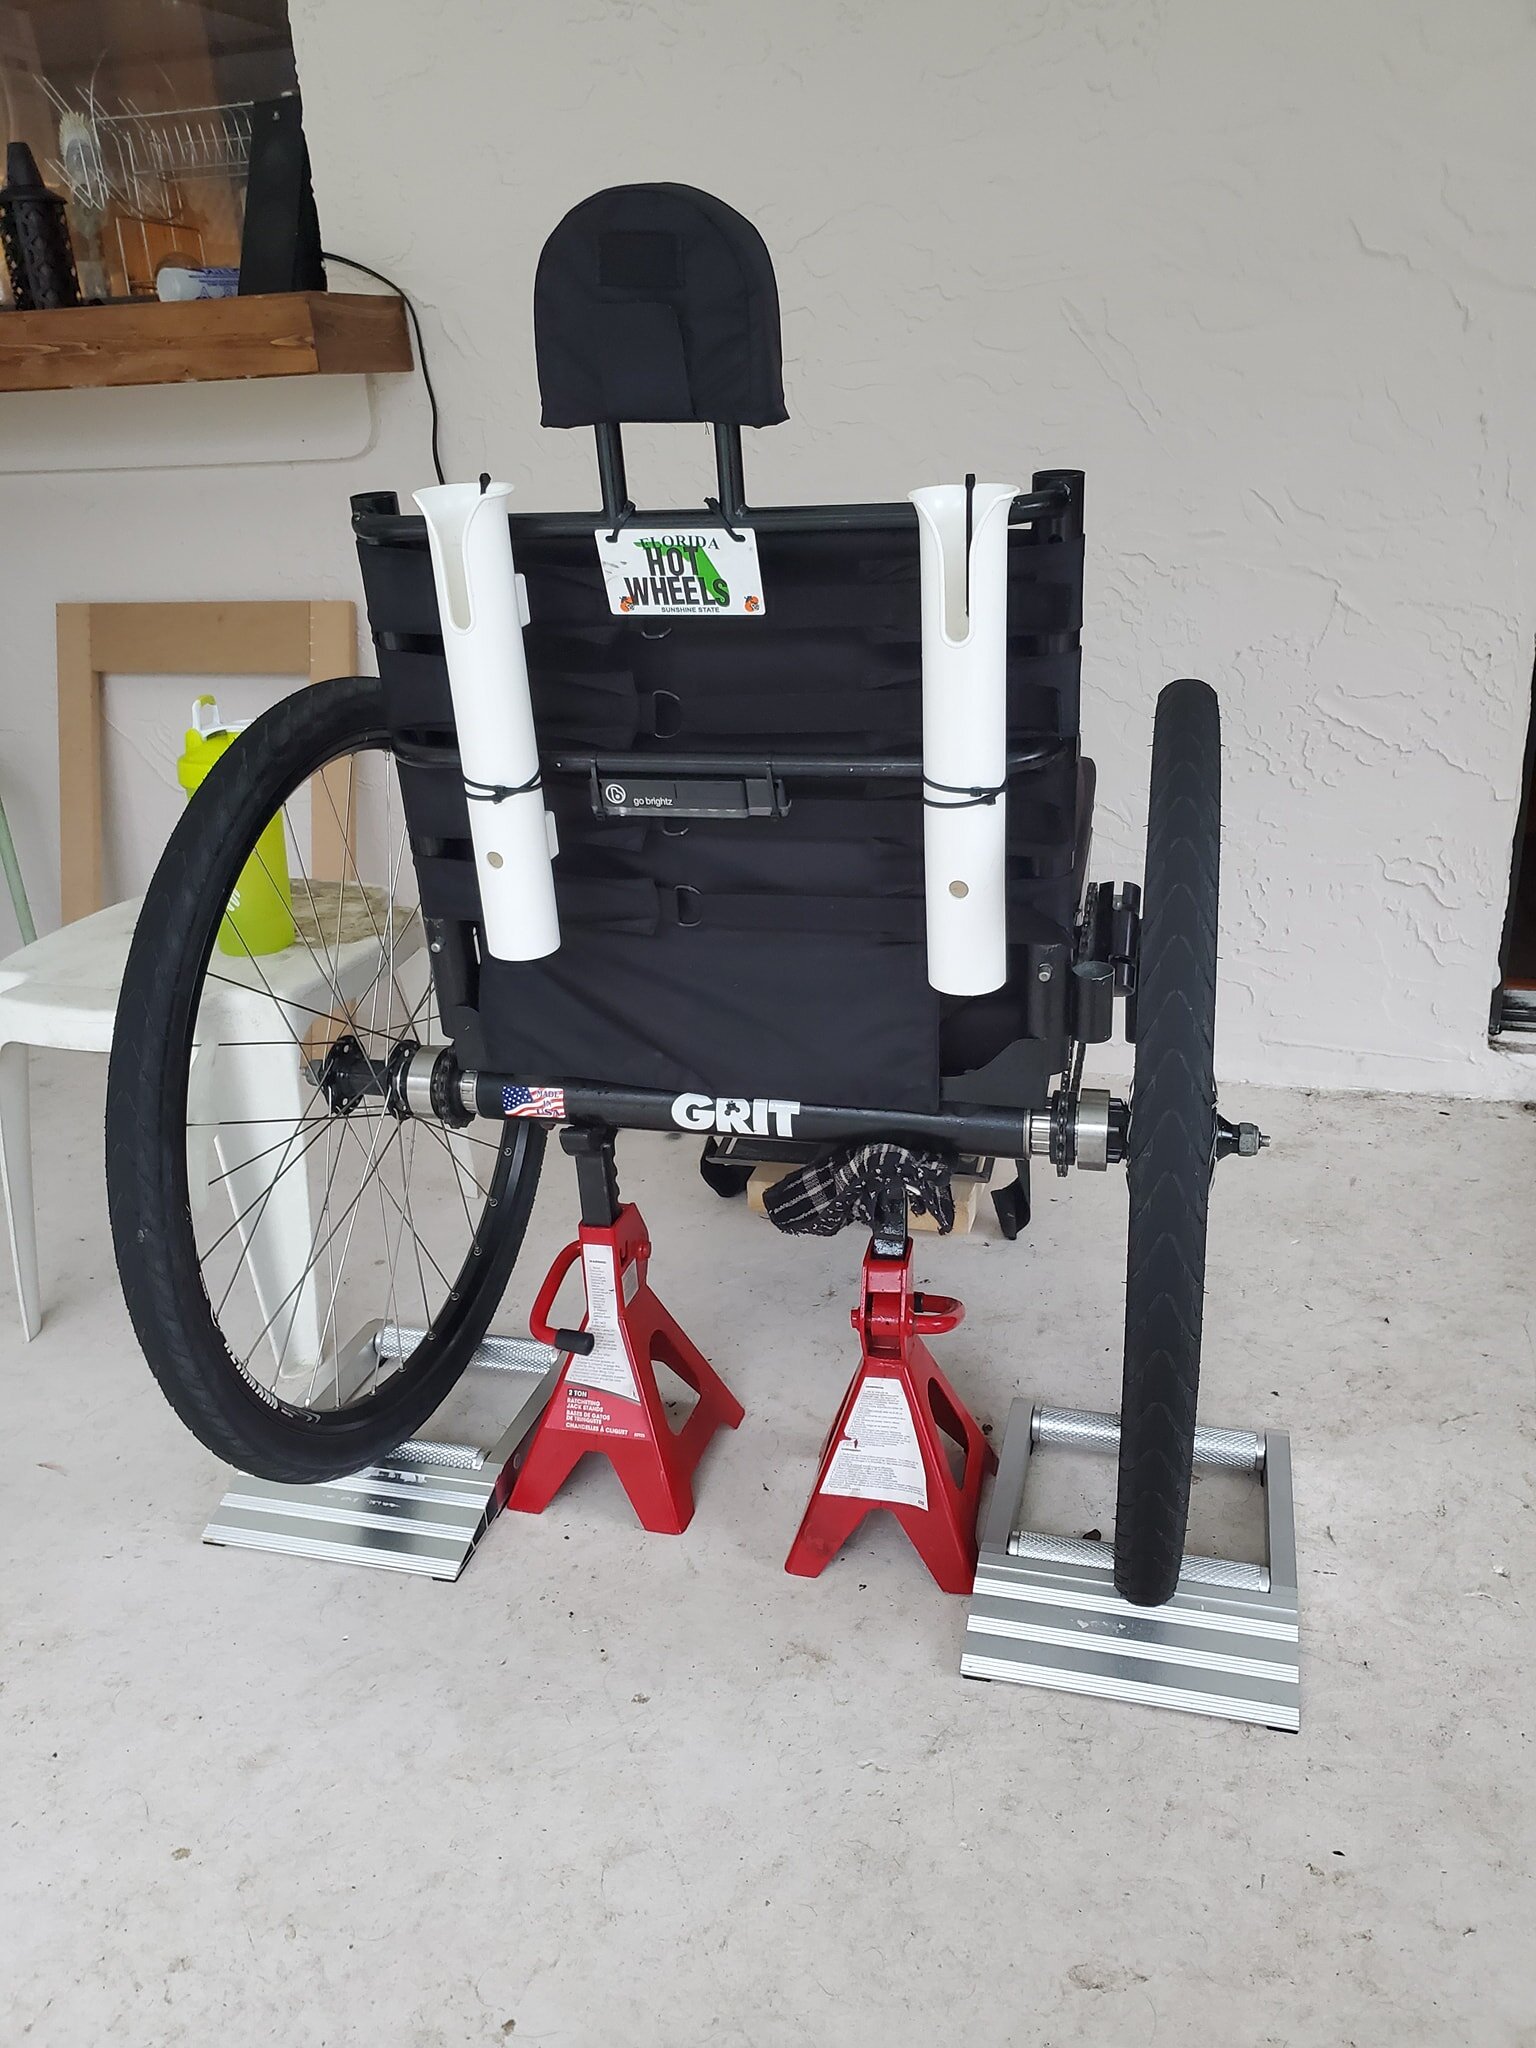
Above: Michelle also uses steel jacks (red) to keep her chair stable.
Step #2: Fix or dock your front wheel. Either build your own frame out of wood or purchase a trailer wheel dock to prevent your front wheel from moving.
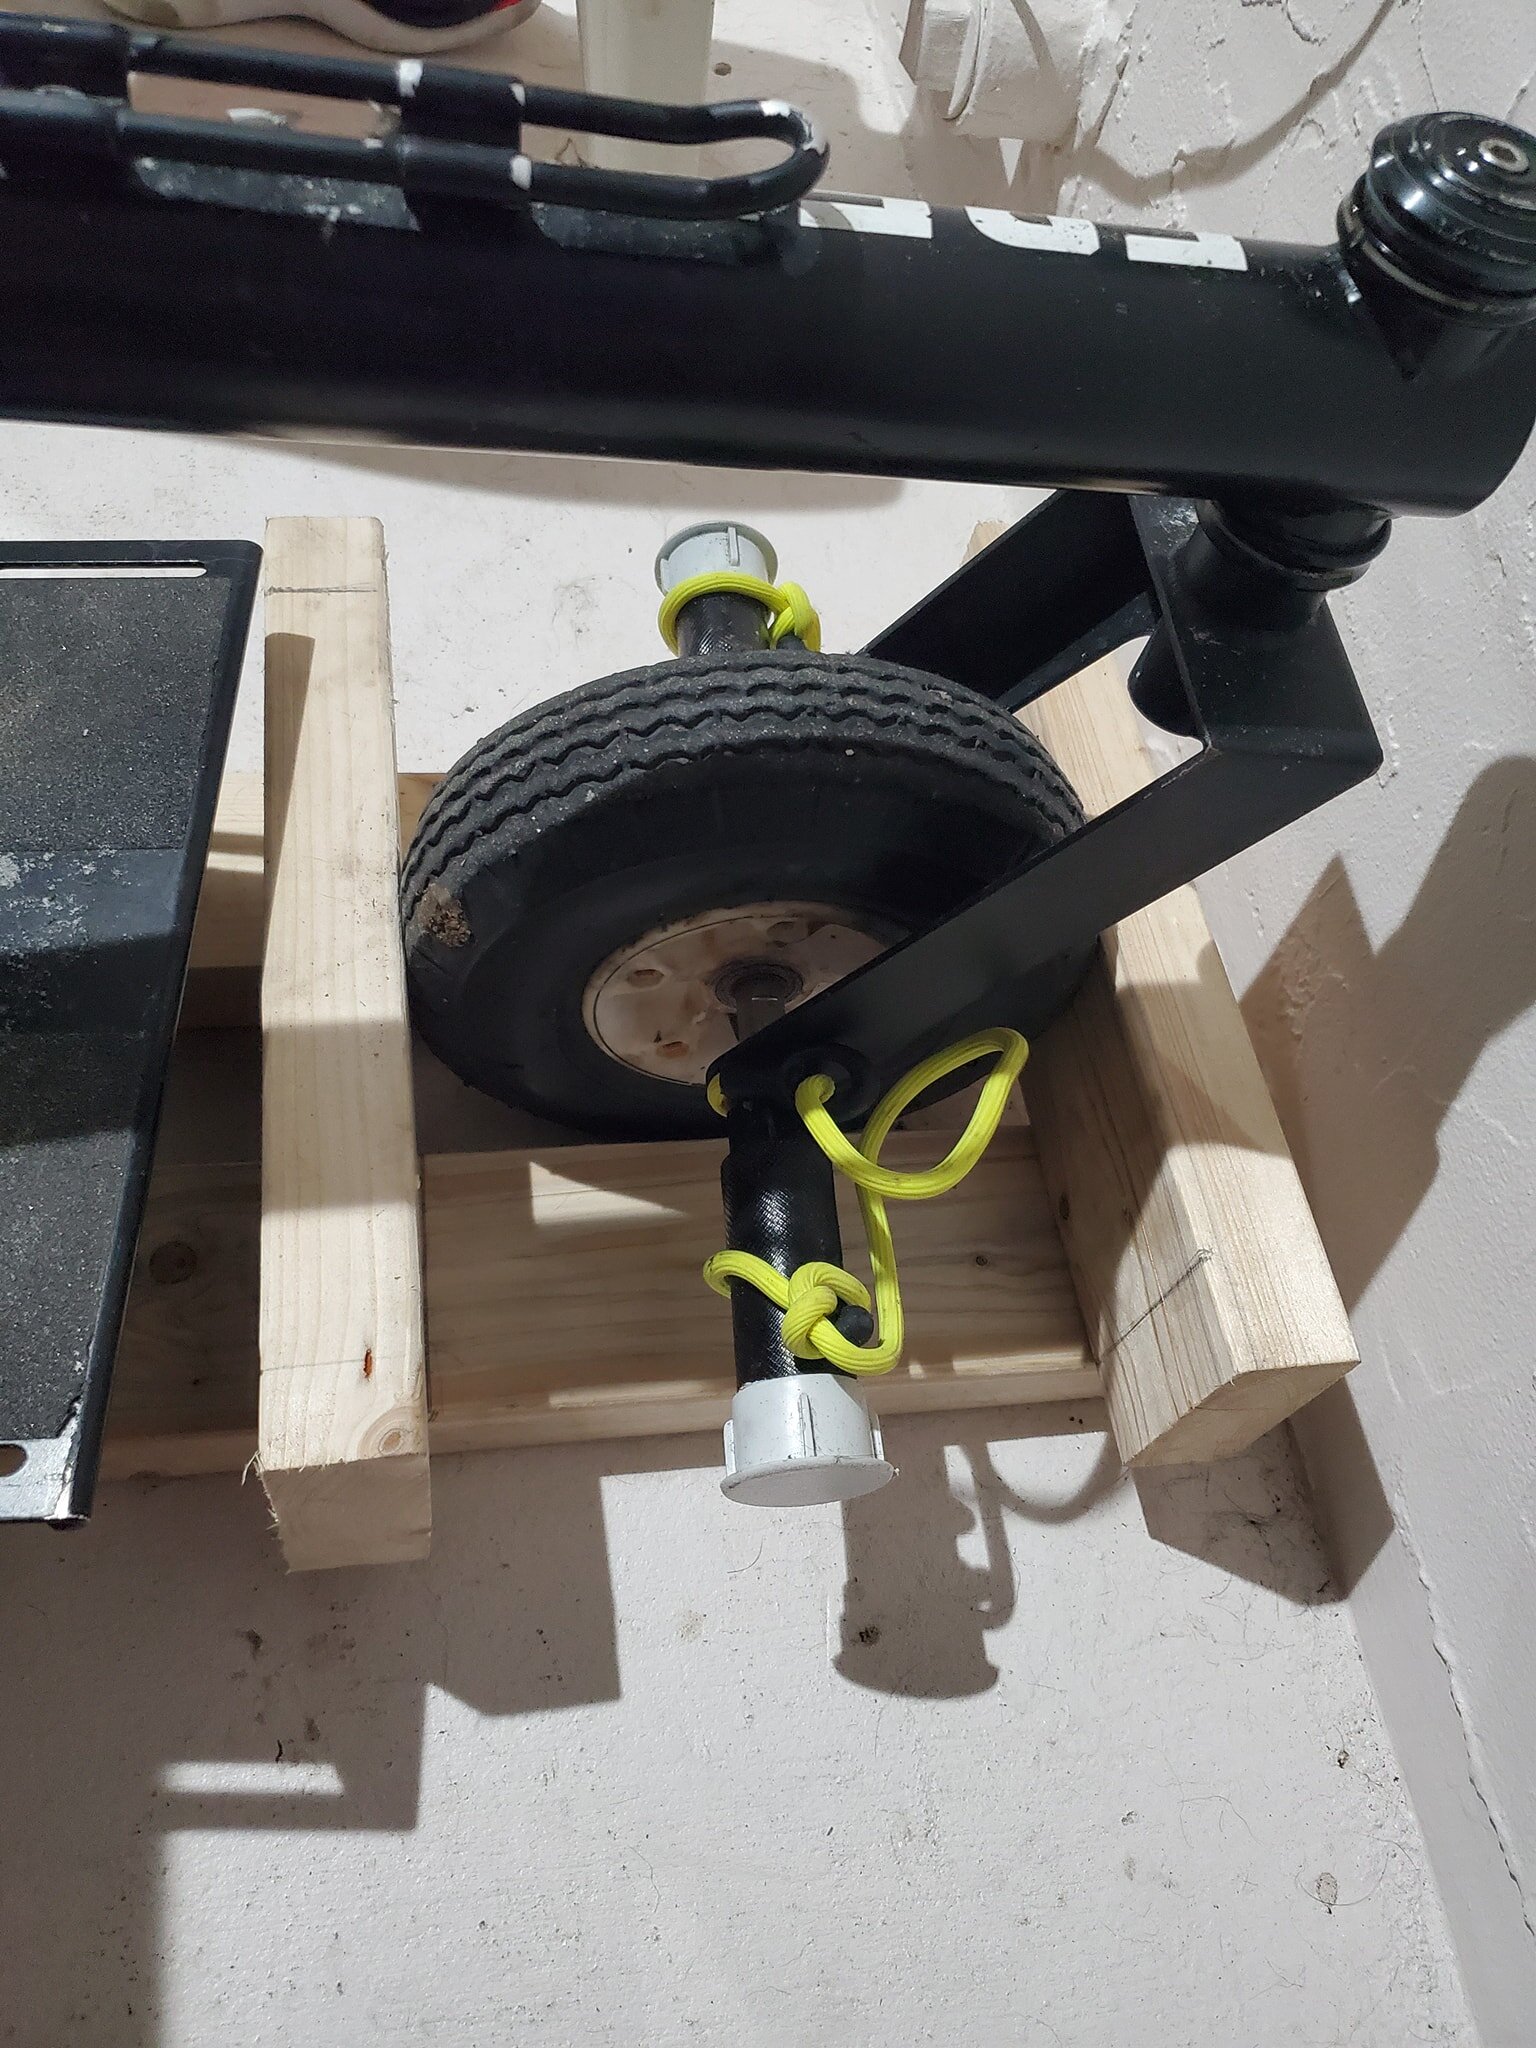
Above: Michelle uses a homemade wooden frame to fix her front wheel.

Above: Tim (aka “Gator”) opts to fix his front wheel with a trailer wheel dock. Note that he also uses the motorcycle wheel cleaning stands for his rear wheels.
Step #3: Exercise! Just like that, you can pump your levers through any weather and any season— all from the comfort of your own home. Did you find another way to set your chair up on rollers? Share it with others in the the GRIT Freedom Chair Rider Group on Facebook (click here)!

What's the narrowest tire you can put on a GRIT Freedom Chair wheel?
Different tire widths yield different kinds of performances. Street riders typically want narrower tires, while offroad riders typically prefer wider tires. You can replace standard GRIT Freedom Chair tires with others, but it is important to select tires that will seat safely on the rims. Going too wide or too narrow can be problematic.
Standard GRIT Freedom Chair wheel rims are 21mm interior. Because of this, the narrowest tire we'd recommend is 1.4" wide. The widest tire we'd recommend is 2.25" wide.
Some riders have gone above and below these thresholds with great success, but staying between 1.4" and 2.25" will ensure a safe and secure fit, so you can focus on the adventure ahead.
I am having a hard time attaching my rear wheels.
If you’re having trouble attaching or removing the rear wheels of your GRIT Freedom Chair, follow these steps:
-
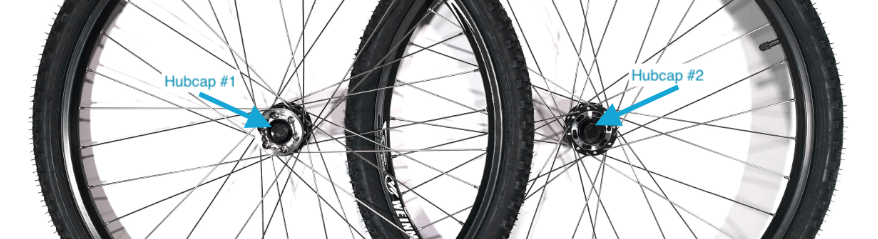
Make sure your hubcaps are present and fully inserted.
-
Each wheel should have two hubcaps–one on the inside of the wheel and another on the outside of the wheel. On the inside, the hubcap is located at the center of the silver coupling. On the outside, the hubcap is exposed–the head of the axle will rest against it. See the be,ow photo for reference.
-
On each wheel, the two hubcaps should be present and fully pressed down.
-
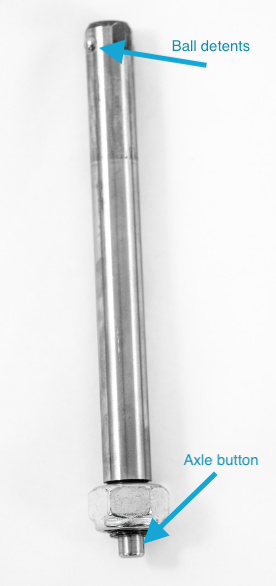
Make sure your axles are in good condition.
-
Remove one axle from its wheel. Once removed, press the axle button. Do the two ball detents on the other end of the axle release?(See the below photo for reference.
-
Repeat with the other axle.
- Next, insert each axle into the chair without the wheel. This will help determine if the issue is with the wheel or the axle. When you insert the wheel into the chair, does it “lock” into place (i.e., does the axle button pop out)? If not, the problem is likely the axle. Contact GRIT to get a replacement. If the axle buttons on both axles do pop out, the issue is likely the length of the axle. Skip to step #4.
-
-
Make sure your axle receivers are in good condition.
-
- The axle receiver accepts the axle. Clean out the inside of the axle receiver and remove any dust/debris.

-
Adjust your axles
-
GRIT Freedom Chair axles are designed to be adjustable. One or both of your axles may be either set to the incorrect length; or, they may have shifted during use.
-
Insert one axle through a wheel and slide the axle into the axle receiver on the chair. Push the axle all of the way into the chair. If the axle button does not pop out, you’ll need to lengthen the axle. Lengthen the axle by placing an adjustable wrench on the head of the axle and another on the flat of the axle. Turn the wrench on the head of the axle counter-clockwise until the head moves.
-
Push the axle all of the way into the chair. If the button does not pop out, repeat the previous step.
-
Note: The shorter you make the axle, the tighter fit the wheel will have on the chair. A super-tight axle will also be more difficult to attach, so leave a bit of play/space in the axle.
-
Test the Fit
-
Insert one axle through one of the rear wheels.
-
Slide the axle into the axle receiver on the chair while depressing the axle button.
-
The axle button should pop out, locking the axle in place. You may have to rotate the axle or the lever coupling so that the grooves in the wheel coupling fall into place. If it doesn’t, repeat the above steps.
-
If the axle button does pop out, pull on the wheel to ensure a tight fit.
-
Repeat for the other axle and wheel.
There is extra space on one wheel. Is it on all the way?
This is normal! Check the button on the wheel.
As long as the button at the end of the axles is popped out and you can’t pull the wheel off, the wheel is securely attached. A slight difference in spacing is okay (and often intentional, depending on the wheel set you are using).
Check the parking brake, the wheel coupling, or give us a call!
Why won’t my footrest stay in place?
Tighten and realign the quick-release level clamp.
Your first step should be to tighten the quick-release lever clamp. Do this by tightening the nut opposite the clamp arm and attempt to lock down the clamp. At this point, also make sure the clamp is behind the footrest tube and closing over the slot in the tube— this will maximize clamping force.
Note: A small batch of chairs that shipped out in June 2018 had a defect that prevented the quick-release lever clamp from securely holding the footrest. We shipped out the necessary replacement parts to anyone whose chair was in this batch and have amended our production process to prevent the issue from happening again. Still, if you’re having trouble securing your footrest, please let us know!
Can I put push rims on my GRIT Freedom Chair?
Sure! However, the process is a bit tricky, so it is important to understand each step and find a qualified technician to perform the labor.
Because installing push rims requires specialized tools (like a drill press), extreme precision, and parts that aren't always easy to find, GRIT recommends you coordinate with a professional bicycle technician on every step of the process. It is imperative that you use the correct parts and that a trained professional handles all assembly.
An overview of the process: Acquire the appropriate wheels from one supplier, acquire the appropriate push rims from another supplier, acquire the torque couplings from GRIT, and then find a bike shop with the necessary tools and knowhow to drill into the wheels and install the push rims. Here's a detailed explanation of how to start from scratch and attach wheels with push rims to your GRIT Freedom Chair:
Step 1: Acquire the appropriate wheels. You will need 36-spoke, 15mm thru axle rims with an ISO 6-bolt disc brake pattern (i.e., mount for the couplings). Because most push rims have 6 tabs, it is far easier to install push rims on 36-spoke wheels than our standard 32-spoke wheels.
NOTE: You can install push rims on 32-spoke rims, but GRIT recommends against it. The tabs should be evenly distributed between the spokes. Since most push rims have 6 tabs, wheels with spoke counts divisible by 6 are preferred!
Standard GRIT Freedom Chair wheels are 559mm in diameter, max 26" x 2.25" with 32 spokes. Our hubs have a 15mm thru axle with 100 over-locknut-distance (OLD) and use an ISO 6-bolt disc mount for the couplings.
Step 2: Acquire the appropriate push rims. The push rims you'll need are 25" (559 mm), 6-tab push rims. Here is one third-party source, though others are available: https://enableyourlife.com/anodized-aluminum-6-tab-wheelchair-pushrim.asp
Step 3: Acquire the torque couplings. This is what connects wheels to the GRIT Freedom Chair and must be purchased through GRIT. To purchase the torque couplings, email support@gogrit.us with that request and we will send an invoice your way.
Step 4: Connect with a qualified bike technician for the installation. Not every bike shop will have the necessary tools for this job; not every bike technician will be willing to drill into the wheels (a required step) to install the push rims. You may need to call around to find someone willing to take on the job. It is important that the holes for the push-rim tabs are measured and drilled precisely; not doing so can ruin the rims or render them unsafe for use.
Can I use different wheels on my GRIT Freedom Chair?
Sure! However, you’ll need to order the wheel couplings (the silver hubs that connect the wheels to the chair itself) from us. It is easy to add these custom-manufactured couplings to many different rims, as long as they:
- Are 559mm in diameter, max 26" x 2.25"
- Contain 36 spokes
- Accept a 15mm thru axle with 100 over-locknut-distance (OLD)
- Use an ISO 6-bolt disc mount for the couplings
With rims that meet the above classifications, you can add any tube-and-tire combination you’d like. This means you have two options:
Option 1 (less expensive but most complicated): Purchase the wheel couplings and bolts by themselves from GRIT, and attach them to the rims you source from a third-party.
Option 2 (more expensive but less complicated): Purchase a set of fully assembled wheels from GRIT.
I'd like more room for my legs. What should I do?
The foot plate can be easily adjusted with the seat post clamp, which secures the foot plate to the main frame. Open the seat post clamp, lower the foot plate, and re-tighten the clamp. If you'd like some more room, we recommend sitting on an extra cushion. This will not only give your legs some more room—you'll also achieve more torque on the levers! You can purchase a GRIT Wedge Cushion on our Accessories page.
GRIT also has other accessories that help riders of various heights find a comfortable place for their feet or legs. Go to our Accessories page and check out our Utility Clamp and its various options, for example.
Other riders have requested GRIT to custom build foot rests that give some more space for their legs to stretch out.
Learn more about the GRIT Freedom Chair
Get all of your questions answered, fast!